The qCrop Book
Welcome to the qCrop Software Suite – a naturally intelligent image cropping microservice. The qCrop Book is the authoritative documentation for all aspects of the qCrop ecosystem.
Orientation guide
If you are completely new to qCrop we suggest to visit the Introduction for a very brief system description, a compilation of potential fields of operation as well as recommendations for further, more detailled, introductory reading.
The Get started section provides a 5 minutes hands-on tutorial to the qCrop Client, which is highly recommended for all audiences:
- decision makers
- photo editors and photographers (qCrop operators)
- system administrators and developers that are going to integrate qCrop with their services (qCrop integrators).
The Get started section then diverts to a collection of problem-oriented how-to manuals separated by target audience (operators / integrators).
The Reference section contains a rather dry, encyclopaedic description of all qCrop components and APIs and mainly addresses qCrop integrators. It also contains the System Requirements and Release Notes. Content of the how-to manuals will be found in the reference section in a more technical and thoroughly style.
Specific topics, that require some deeper explanation or discussion are collected in the Explanations section. This articles are also linked from other parts of the documentation, where appropriate.
How to use this documentation
All content can be directly reached via the sidebar on the left side. The sidebar can be toggled with the hamburger menu in the top left corner of the toolbar.
The Color Theme of the documentation can be changed via the brush icon in the toolbar.
A full text search of the qCrop book can be initiated with the magnifier icon in the toolbar.
© 2020-2021, append[x] GmbH, Egling-Endlhausen
Introduction
Image Cropping
qCrop is a collection of online-tools for automatically cropping images into any desired aspect ratio. Why is this a thing, after all? Well, changing the aspect ratio of an image – say, from landscape to portrait – can only be accomplished with the removal of parts of the image. This ultimately alters the motif and visual composition of the image, and, as a consequence, a decision has to be made, which parts of the image should remain and which parts should be stripped. Such a decision can be demanding for a human user and proves impossible for the computer to do in a dependable way. Rescaling and resampling of an image is easy for the computer - reconveying the image composition in case of an aspect ratio change is not.
Modern publication habits often require the same image to be published in multiple aspect ratios: for example as squarish thumbnail on the landing page, as landscape banner on the article page and in its original 4:3 aspect ratio when magnified by the reader. Before qCrop, it was a tedious task for photo editors to produce each and every required variant of an image for the digital workflow. And subsequent supplementation of additional aspect ratios for the possibly hundred of thousands of photos in the archive seemed like an unimaginable effort.
But now, qCrop promises just that: the automatic, reliable, best motif-preserving cropping of images to any aspect ratio, on demand, in any environment.
If you want to learn more about the general and artistic aspects of image composition (and the aspect ratio as part of it), we suggest to proceed reading the article Understanding aspect ratio. Feel free to skip this article if you are familiar with the subject.
Naturally intelligent
Numerous attempts have been made in the past to automize image cropping with software tools. There are plenty of approaches, including analysis of image properties like color distribution, contrast and sharpness, the recognition of faces and the attempt to find focal areas of an image with Machine Learning and Artificial Intelligence. While some of these efforts produce acceptable (and sometimes astonishing) results for certain types of images, they unpredictably and utterly fail on others. In a fully automated, unguarded workflow, though, we have to rely upon each and every cropping operation to return reasonably perfect results.
We found human intellect to be the only reliable source for assessing an image’s composition and statement. qCrop provides the means to enrich the metadata of an image with cropping hints that are placed by a human user: once per image, within seconds and universally valid for every aspect ratio. So whenever the qCrop service automatically crops an image to a new aspect ratio, the process is implicitly determined by human decision. This is, what we call Naturally Intelligent.
If you want to learn more about the advantages and disadvantages of Machine Learning and Artificial Intelligence in the realm of image cropping and our decision process towards a human driven, naturally intelligent approach, we suggest to proceed reading the article qCrop and Artificial Intelligence.
Microservice
The qCrop method requires two main components:
- the qCrop Client: a tool to apply, visually assess and embedd cropping hints to the metadata set of an image.
- the qCrop Service: a tool to retrieve an automatically cropped image by passing parameters for the desired target size, file format, color profile and the like.
qCrop is providing those tools as one unified serverless microservice, which means that invoking the functionality is as easy as executing a weblink. Currently in the form of docker containers, qCrop is extremely easy to scale and to integrate with existing IT infrastructure and 3rd party applications.
Besides these two main components, there are additional tools for developers and integrators that assist in implementation and diagnosis. Learn more about the qCrop framework by proceeding to the article The qCrop Architecture.
Who qCrop Is For
Publishers
qCrop not only provides huge cost-saving opportunities by disburdening photo editors from tedious routine jobs, but also gives back full creative freedom by eliminating technical constraints in the process of image cropping.
Stock Photo Agencies
qCrop clears the way for brand-new business opportunities in the highly competitive market of stock photography, based on a file-less image delivery concept without the need for interim handling by the customer.
Marketing
qCrop removes image related jobstoppers in modern marketing workflows.
System providers
qCrop integrates effortless with Digital Asset Management (DAM) systems, Content Management systems (CMS) and other production tools.
Advertising Agencies / Digital Agencies
qCrop enables agencies to implement unguarded, fully automated, fully dynamic “content first” and template driven workflows by eliminating manual image cropping efforts and constraints to small subsets of prefabricated aspect ratios. This applies to online/digital as well as print.
Photographers
Last but not least, qCrop allows photographers to retain more control about the appropriateness of their work, even after the image has left the photographer’s immediate sphere of influence. In addition, preparing the images with cropping hints for automated image processing increases their value for potential customers.
© 2020-2021, append[x] GmbH, Egling-Endlhausen
Get started
Theory Of Operation
This is how qCrop works:
Every image that is supposed to be automatically cropped to arbitrary aspect ratios in an automated production workflow with qCrop, shall be prepared first by a human user. Preparation takes place in a special piece of software, called the qCrop Client. Basically, the user interactively repositions three visual guides (two frames and a pointer) on top of the master image. Those visual guides are cropping hints and the sophisticated qCrop algorithm takes those hints into account when deciding the clipping area for a given aspect ratio of that image.
During the application of the cropping hints, the qCrop Client provides a live cropping simulation for a selection of common aspect ratios. It is the user’s task to find a setting for the visual guides that provides satisfying cropping results for all aspect ratios in the live previews. A satisfying result is one that preserves the declarative emphasis of the motif in the context of the image’s intended use; that keeps the spatial composition as good as possible; and eschews unsightly clippings - an assessment that, to our believe, can only be achieved by a human being. In qCrop terminology, the person applying the cropping hints is called a qCrop Operator.
Once committed, the cropping hints are automatically embedded in the EXIF metadata of the image, which is not altered in any other way. It is important to understand that applying the qCrop cropping hints does not produce actual cropped versions of the image, but just the information that is needed later on to produce a concrete aspect ratio. The live previews of the qCrop Client are a transient visualization and the assumption is, that if all of the previews look good, so will all other aspect ratios in-between.
Image preparation is performed by qCrop Operators, the cropping hints are universal for all possible aspect ratios of an image, they have to be created only once in a preparation step that takes only a couple of seconds and the hints live forever completely within the image file - no external databases are required to store or access that information.
The qCrop Client is intended to be integrated into production environments. It might be part of your DAM or Content Management system or some custom-made in-house tool. For example, for teaching purposes, we have integrated the qCrop Client into this documentation (you will encounter the qCrop Client in the next chapter).
The second major building block of qCrop is the qCrop Service, a cloud-based application, that will crop an image to any given target size (and therefore any possible aspect ratio). To retrieve a cropped image from the qCrop Service, all that is required is to generate and call a URL consisting of three parts:
- the service address and service type, for example: “https://qcrop.net/crop-to-file”. The service address depends on the actual qCrop environment. There are additional service types, that will be introduced later in this documentation.
- a parameter block for the desired target specification, for example: “w480:h320:mjpg” to get a cropped image 480 pixels wide and 320 pixels high in JPEG format. There are many more parameters, that will be introduced later in this documentation.
- the URL of the master image, for example: “qcrop.cloud/QCROP_SAMPLES/24.jpg”
A complete qCrop Service URL might look like this (and yes, you can click it to see the result and you might want to copy/paste the URL to your browser’s address bar and play with the parameters to get different results):
https://qcrop.net/crop-to-file/w480:h320:mjpg/qcrop.cloud/QCROP_SAMPLES/24.jpg
Upon reception of such a request, the qCrop Service retrieves the image file, crops it to the given target size and file type (obeying the qCrop cropping hints within the image’s metadata) and finally delivers the cropped image to the caller. The cropped image is also cached for faster delivery the next time.
Integration of the qCrop Service typically consists of generating the qCrop URL syntax within the templates of the Content Management System. The qCrop Service can be self-hosted by the customer, or rented as a Saas solution. IT personell, that integrates the qCrop Client or the qCrop Service in existing systems and workflows are called qCrop Integrators in qCrop’s terminology.
Next steps
The next chapter provides a 5 minutes interactive tutorial “Preparing your first image” which is recommended for all audiences as basic quick-start prerequisite for the advanced how-to guides.
© 2020-2021, append[x] GmbH, Egling-Endlhausen
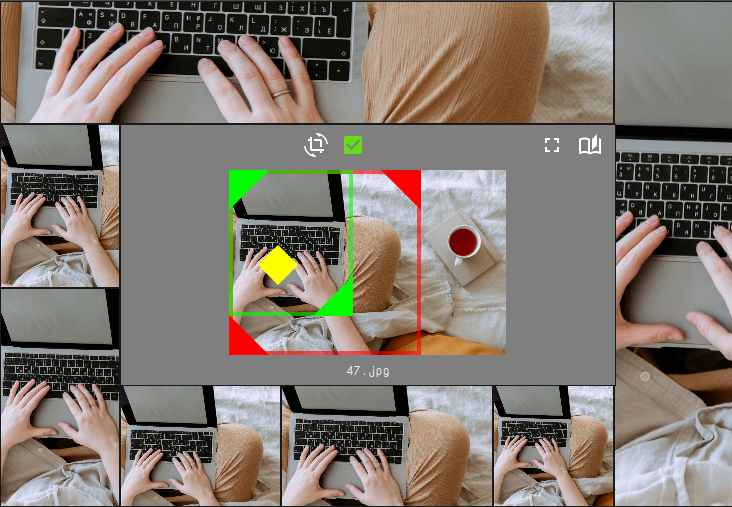
Preparing your first image
In this five minutes tutorial we will teach you the most basic skill to apply cropping hints to an image – the usage of the Vector Pointer. Providing cropping hints for an image is the most reliable way to ensure perfect automatic cropping results later on.
Interactive qCrop Webclient
For the purposes of this tutorial we have embedded a live qCrop Webclient in this page, so you can execute the tutorial without leaving the documentation.
The center part of the qCrop Webclient shows the original image (with the filename underneath), some icons in the toolbar above and a number of colorful symbols layered on top of the original image. We call this center part of the qCrop Webclient the Workarea. The yellow, green and red symbols are the interactive Cropping Hint Handles.
Around the workarea there is a collection of cropped versions of the original image: an extreme landscape and portrait on the top and right, a quadratic version and four more versions in 4:3 and 16:9 aspect ratios, both in landscape and portrait each. We call this the Preview Mosaic and this previews provide a live impression of how the qCrop Cropping Service would trim the images to the respective aspect ratios in dependence of the cropping hints.
Using the Vector Pointer
Now click/touch and hold the large yellow diamond-shaped symbol in the center of the original image and move it around. This symbol is the so-called Vector Pointer. Watch, how the Preview Mosaic reflects the position of the Vector Pointer while you move it. Try to find a position for the Vector Pointer at which all of the live previews show an acceptable cropping result. Make sure, that the extreme landscape and portrait previews look good – they are the most difficult to satisfy. Then release the Vector Pointer.
A good solution might look like this:

You are done. The position for the Vector Pointer will be stored in the metadata of the original image and you have thereby prepared the image for cropping to any aspect ratio in the future (our assumption is, that if all the aspect ratios in the Preview Mosaic look good, so will all other aspect ratios in between). You might click the green checkbox icon in the toolbar to switch to another motif and continue practicing, if you like.
Congratulations, you are now a qCrop Operator!
Moving on
A good many times, placing the Vector Pointer will be a sufficient method to provide a good universal cropping hint for all possible aspect ratios of an image. But all too often the motif will not allow to get a satisfying result for all the previews by just moving the Vector Pointer. For that case, qCrop provides additional, more sophisticated cropping hints. Become an expert qCrop operator by attending our interactive How To Guides, that will teach you the subtle details of applying cropping hints to more intricate image motifs.
© 2020-2021, append[x] GmbH, Egling-Endlhausen
How-to guides for Operators
In this series of how-to guides we will teach you everything to become a Master qCrop Operator. We assume that you made yourself familiar with the basic concepts of the qCrop paradigm. If not, we suggest to read the Introduction first.
Each tutorial contains an interactive qCrop Client, which allows you to execute the described procedures on pre-selected images right away. Just follow the guides, preferably in order:
- The “Force Crop Frame”
- The “Preservation Crop Frame”
- The “Vector Pointer”
- Multiple cropping hint sets
- Workflow optimization
© 2020-2021, append[x] GmbH, Egling-Endlhausen
How to use the “Force Crop Frame”
The Force Crop Frame is a red rectangle with two triangular red handlers in the bottom left and top right corners. You won’t necessarily be able to see the red border of the rectangle, as it might be overlayed with the green Preservation Frame (which is always the case when an image is opened in the qCrop Client for the first time – Force Crop Frame and Preservation Frame enfold the entire image by default). The red handlers will always be visible, though.
The Force Crop Frame is used to cut away edges of the image in any case, independently of the target aspect ratio and other cropping hints. In practice, this frame is rarely applied, as professional photographs usually do not require trimming of the edges. But for those cases where we want to get rid of something on the edge – in every aspect ratio – the Force Crop Frame will do the job without the need to alter the master image.
Use the interactive qCrop Client in the box below to try this tutorial’s excercise:
Problem
This sample file shows a cup of tea on a white notebook near the right edge of the image. We do not want to show the cup and notebook ever.
Solution
Click/touch and hold the red triangular handler in the upper right of the master image. Move it to the left carefully, until the cup of tea and the notebook are outside the Force Crop Frame. Watch, how the cup and notebook vanish from all previews. When happy with the result, release the Force Crop Frame handler.
A good solution might look like this:
Expert Tips
- The red triangular Force Crop Frame handler in the lower left can be used just like the one in the upper right corner of the exercise.
- The green Preservation Frame and the yellow Vector Pointer must remain within the Force Crop Frame. The software will push them automatically if they get in the way during the Force Crop Frame handler movement. It is therefore necessary to re-evaluate the positions of the Preservation Frame and the Vector Pointer after each modification of the Force Crop Frame!
- For best efficiency, the Force Crop Frame should always be applied first (if required), before the application of other cropping hints, to avoid the readjustments mentioned in the paragraph above.
© 2020-2021, append[x] GmbH, Egling-Endlhausen
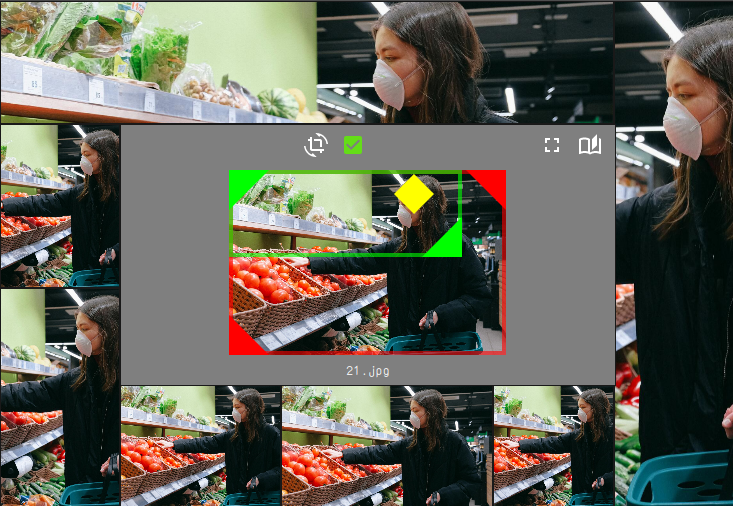
How to use the “Preservation Frame”
The Preservation Frame is a green rectangle with two triangular green handlers in the top left and bottom right corners.
The Preservation Frame is used primarily to indicate that part of an image, that should not get clipped if at all possible. By this definition, the Preservation Frame seems to be just another term for the focal area of the image. Well, it is – it will almost always embrace the most important part of the image. But it is also used to finetune the composition of the motif in the cropped versions.
As a general rule, you apply the Preservation Frame, if you were not able to find a good solution for the image with the yellow Vector Pointer alone. In that case you place the Preservation Frame around the most important part of the image. Choose a rather small area for that purpose – for example, if the focal area is a person as in the excercise below, you place the frame around the head rather than the whole body. This will center the focal area in the more extreme aspect ratios, but sometimes result in the unwanted and unnecessary loss of any asymmetrical composition in some of the aspect ratios – maybe in a way that cannot easily be solved with readjusting the Vector Pointer. If this happens, you can resize the Preservation Frame – carefully watching the live previews – to find a best fit for all aspect ratios. There is no surefire procedure for this, just play and practice a bit with it until you get the hang of it. In the end, for the best result, the green frame might not exactly enfold the key aspect of the motif. That is why we avoid the term “focal area”, but rather use the more specific term Preservation Frame.
Use the interactive qCrop Client in the box below to try this tutorial’s excercise:
Problem
The sample image shows a woman with a face mask grabbing tomatoes from a shelf in a supermarket. The context of the image is obviously the Corona pandemy. There is a story in the image, which has to do with responsibility of the indivual in public space during a health crisis. For sure, the face with the mask is the most significant element of the motif, without it, the rest of the image would not tell a story. But the visibility of the public space – in form of a vegetable shelf in the supermarket is also important – we would like to include this with a lower priority if by any means possible.
Solution
First set the green Preservation Frame around the head of the woman. To do so, click/touch and hold the green triangular handler in the upper left of the master image. Move it to the right and a little down, so that it ends up near the upper left corner of the woman’s head. Repeat with the green triangular handler in the lower right accordingly.
Now play with the yellow Vector Pointer until the woman’s face is centered in the extreme portrait preview on the right. Then look at the two portrait previews on the left side: the body of the woman is centered, but there is plenty of space to move the body a bit to the right and thereby increase the visibility of the vegetable shelf. This will not succeed with the yellow Vector Pointer though – if you move the bodys to the right, the face with the mask will go out of scope in the extreme portrait aspect ratio on the right side.
Instead readjust the green Preservation Frame: grab the upper left handle and extend the frame as far left as possible. This way we can keep the head centered in the extreme portrait aspect ratio, but include as much shelf as possible in the other portrait versions.
A good solution might look like this:
Expert Tips
- The yellow Vector Pointer must remain within the Preservation Frame. The software will push it automatically if it gets in the way during Preservation Frame handler movement. It is therefore necessary to re-evaluate the position of the Vector Pointer after each modification of the Preservation Frame!
© 2020-2021, append[x] GmbH, Egling-Endlhausen
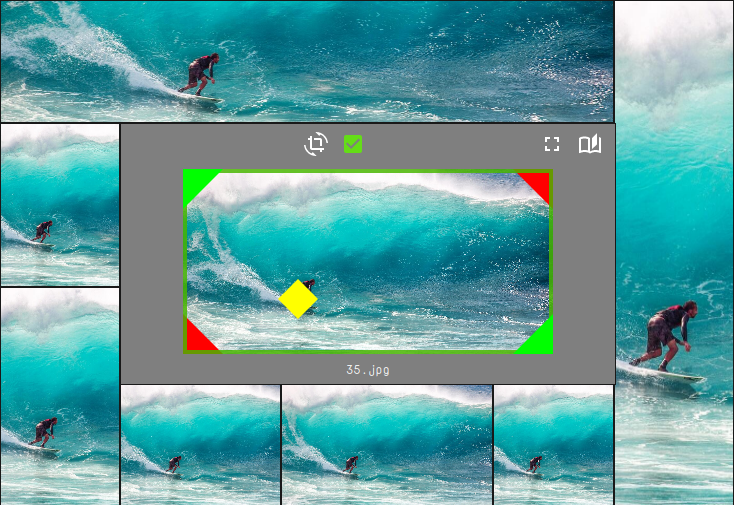
How to use the “Vector Pointer”
Hint: if you have already accomplished the quick start exercise Preparing your first image, you might skip this section.
The Vector Pointer is shown as a yellow diamond within the master image.
The Vector Pointer is an essential cropping hint, as it determines the position of the virtual cropping frame along its free axis (it is not necessary to understand the technical details of this, as the behaviour of the Vector Pointer is completely intuitive). In many cases, applying the Vector Pointer alone already provides satisfying results for all aspect ratios, making it unnecessary to apply the green Preservation Frame.
The Vector Pointer will often be right on – or close to – the focal point of the image, but not necessarily in any case! This is the reason why we do not call it “Focal Point”, but rather Vector Pointer – this term better reflects its function as a parameter for pushing the image clipping in a certain direction.
Use the interactive qCrop Client in the box below to try this tutorial’s excercise:
Problem
Find a position for the Vector Pointer at which all previews show a nice cropping result. The surfer shall be visible in all of them and the asymmetric composition shall be preserved if possible. Do not use the red Force Crop Frame or the yellow Preservation Frame in this excercise.
Solution
Click/touch and hold the Vector Pointer in the center of the original image and move it around. Watch, how the Preview Mosaic reflects the position of the Vector Pointer while you move it. Make sure, that the extreme landscape and portrait previews look good – they are the most difficult to satisfy. When happy with the result, release the Vector Pointer.
A good solution might look like this:
Expert Tips
- The Vector Pointer must remain within the green Preservation Frame. The software will push the Vector Pointer automatically if it gets in the way during the Force Crop Frame or Preservation Frame handler movement. It is therefore necessary to re-evaluate the position of the Vector Pointer after each modification of one of the two frames!
- For best efficiency, the Force Crop Frame should always be applied first (if required), before the application of other cropping hints, to avoid the readjustments mentioned in the paragraph above.
© 2020-2021, append[x] GmbH, Egling-Endlhausen
Using multiple cropping hint sets
Announcement: This feature is planned for qCrop v21.03.001 and will be documented in time for the release!
© 2020-2021, append[x] GmbH, Egling-Endlhausen
Workflow optimization
When introducing qCrop in an existing environment, there typically exists a large stock of imagery that has to be marked up with cropping hints before the images can be used by the qCrop Cropping Service.
It is therefore essential to be as efficient in this task as possible. Applying qCrop cropping hints should ideally take only a couple of seconds per image. To reach this goal, we recommend the following procedure:
- Apply the Force Crop Frame – if at all required – first, as any modification to it voids the other cropping hints.
- Next, apply the Preservation Frame to the focal area of the image in a rather “mechanical” sense, without taking care of subtle details regarding the image composition at this point.
- Use the Vector Pointer to finetune the result. If no satisfying result can be acquired, start to play with the Preservation Frame and the Vector Pointer until the best result is reached.
Because many images can be perfectly solved with only the Vector Pointer, there is a second established workflow, which gives the Vector Pointer an early shot with the expectation to avoid the application of the Preservation Frame. If you generally experience good results with the “Vector Pointer only” approach in your stock, this workflow might save significant time:
- Apply the Force Crop Frame – if at all required – first, as any modification to it voids the other cropping hints.
- Try the Vector Pointer and if a good result can be obtained, stop right here.
- Otherwise apply the Preservation Frame to the focal area of the image in a rather “mechanical” sense, without taking care of subtle details regarding the image composition at this point.
- Use the Vector Pointer to finetune the result. If no satisfying result can be acquired, start to play with the Preservation Frame and the Vector Pointer until the best result is reached.
© 2020-2021, append[x] GmbH, Egling-Endlhausen
How-to guides for Integrators
In this series of how-to guides we will teach you the essential skills to successfully use the qCrop services for production. We assume that you made yourself familiar with the basic concepts of the qCrop paradigm. If not, we suggest to read the Introduction first. As a qCrop Integrator you will most likely not mark images with qCrop cropping hints, but we recommend to execute the short Preparing your first image tutorial to get an idea of the user’s perspective of qCrop.
Each tutorial conveys the most essential features of each qCrop service and then relegates to a more exhaustive compendium in the reference section of this book.
- Accessing the qCrop Server
- The Crop-to-File Service
- The Crop-to-Data Service
- The Crop-to-Debug Service
- The Cache Service
- qCrop Webclient Integration
© 2020-2021, append[x] GmbH, Egling-Endlhausen
Accessing the qCrop Server
All qCrop Services require a running instance of the qCrop Server. Provisioning of this server depends on the kind of hosting and service agreement and is beyond the scope of this book. Please contact sales@appendx.de for licensing options.
For the purposes of the documentation we provide a free service at https://qcrop.net, so you can try the qCrop Services on a live system. Please respect, that this service is not allowed for other purposes than familiarization with the qCrop system. In particular it is not allowed to use this server for real live production or commercial purposes!
The qCrop Server is typically (but not necessarily) operated at standard port 80 via TSL on a dedicated domain/subdomain.
qCrop Service Short Reference
If a GET request is sent to the qCrop Service URL without any parameters, a short, up-to-date server description is returned as plain text:
Example: https://qcrop.net
 QCROP Webservice
    (c) 2020 append[x] GmbH

    qCrop: Naturally intelligent Image Cropping as a Microservice
    Learn more at http://www.appendx.de

    USAGE

      GET /crop-to-file/<crop-parameters>/<image-url>

          crops the image at <image-url> according to the parameters
          defined in <crop-parameters> and delivers the target image
          as result.
          If qCrop cropping hints exist in the source image, they will
          be respected, otherwise a centered crop is executed.

          The cropping parameters have to be delimited with a colon (:).
          Supported parameters are:
          - w<width>          : width of the target image in pixels
          - h<height>         : height of the target image in pixels
          - a<WxH>            : aspect ratio as WIDTHxHEIGHT
          - m<mime>           : mimetype of the target image
                                (jpg, tif, png)
          - q<percent>        : compression quality in percent for target
                                (only relevant for JPG target)
          - d<X>              : target resolution in dpi
          - d<XxY>            : target resolution in dpi with
                                different values for x and y
          - prRes<ValueUnit>  : print resolution in ppi or ppcm
          - phyW<ValueUnit>   : physical width of the target image
                                in cm, mm or inch
          - phyH<ValueUnit>   : pyhsical height of the target image
                                in cm, mm or inch
          - c<ProfileName>    : convert target to color profile
                                (See full documentation for available
                                color profiles)
          - stripColorProfile : remove color profile from target image
          - nocache           : force reload of source image

          Illegal parameters are silently ignored.


      GET /crop-to-data/<crop-parameters>/<image-url>

          takes an array of target aspect ratios as parameter and returns
          a JSON object with cropping rectangles as pixels or percentage.

          NOT IMPLEMENTED YET!


      GET /webclient/<client-parameters>/<image-url>

          invokes the qCrop webclient application for the image at
          <image-url>.

          NOT IMPLEMENTED YET!


      GET /cache/<image-url>

          retrieves the given file at <image-url> and copies it to the
          local server cache; then builds dependent variants like the
          webclient preview and digital primary file within the cache.
          Preloading images to the cache with this command
          significantly speeds up the webclient and cropping process.

          Returns a full dump of all cache related data of <image-url>
          for diagnostic purposes.


      GET /metadata/<image-url>

          retrieves common metadata (Exif/XMP/NITF) and qCrop metadata
          of the image at <image-url> for diagnostical purposes.
© 2020-2021, append[x] GmbH, Egling-Endlhausen
How to use the Crop-to-File Service
Crop-to-File is the most important cCrop service. It is used to produce a cropped version of an image (which – in ideal circumstances – has been provided with qCrop cropping hints before).
The Crop-to-File Service URL
The Crop-to-File service URL consists of four elements:
- Service scheme + host
- Route
- Cropping parameters
- Image URI (without the scheme)
Service scheme and host
Please refer to Accessing the qCrop Server for details about the Service scheme and host.
For training and evaluation purposes, use https://qcrop.net/ as a service scheme and host.
Route
The second parameter of the URL (the first element of the path) is called the route – it specifies which service is requested from the server. For image cropping, the route is crop-to-file/.
Cropping parameters
The cropping parameters describe the desired constitution of the resulting, cropped image (in qCrop’s terminology: the target). Cropping parameters consist of a keyword or key character, optionally followed by some value. The parameters are separated with colon (”:“) and the parameter block is closed with a slash (”/“).
The most important parameters are:
Size related
-
w<WIDTH> : the width of the target image in pixels, e.g.: w1900.
-
h<HEIGHT> : the height of the target image in pixels, e.g.: h1020.
-
a<WIDTHxHEIGHT> : the aspect ratio of the target image as numerical relation. This means that the values for width and height have no unit. Examples: a1920x1020; a4x3; a100x100.
If the w- and h-parameters are defined, the target image will be cropped to exactly that size. Example: w1920:h1080.
If the a-parameter is used together with one of the w- or h-parameters, then the missing size parameter will be calculated from the given size parameter in respect to the given aspect ratio. Example: w1920:a4x3.
If only the a-parameter is passed to the service, the target image will be cropped to the width of the source image and the height will be calculated according to the aspect ratio of the a-parameter. Example: a1x1.
It shall be avoided to pass all three size related parameters (a, w and h) together as there might be a contradiction of the aspect ratio calculated from w and h and the a-parameter. In this case, the a-parameter is completely ignored and no error is reported. Example: a4x3:w800:h200 will crop to 800 by 200 pixels.
If no size parameters are passed to the service at all, the qCrop algorithm will use the width and height values of the source image for the target.
Notice: former versions of qCrop allowed the s-parameter for a combined definition of w and h. This parameter is still supported for backward compatibility, but will be deprecated in future releases.
Filetype related
The target image can be one of three mimetypes: JPEG, TIFF or PNG.
-
m<MIMETYPE> : the mimetype of the target image. <MIMETYPE> shall be one of the following three-letter codes: jpg, tif, png. If no m-parameter is passed, or an invalid mimetype code is passed with the m-parameter, the qCrop service will default to jpg. Examples: mjpg, mtif, mpng.
-
q<PERCENTAGE> : the compression quality of the target image. Currently this parameter only applies to targets of type JPEG, it is ignored for other mimetypes. The <PERCENTAGE> value can range from 1 (extremely small file size, but poor quality) to 100 (larger filesize, but excellent quality). If this parameter is not passed, it will default to 75.
Example: to produce a JPEG file with a quality of 75%, include mjpg:q75 in the parameter block.
Notice: Future versions of qCrop will support additional mimetypes.
Color related
Two parameters can be passed for color management:
-
c<PROFILENAME>: target color profile. Example: csRGB.
-
stripColorProfile: if set, the color profile will be removed from the target.
Color management is a complex topic and requires some background knowledge as well as careful considerations. Please refer to the comprehensive documentation of the color related parameters and a full list of supported color profiles in the dedicated reference article Color Management.
Other parameters
Crop-to-File supports a couple of additional parameters, most of which deal with pixel density and physical resolutions and dimensions. Those parameters are mainly relevant in the print domain, but hardly ever in digital publishing. Please refer to Crop-to-File URL syntax for a full reference of those parameters.
Image URI
The image URI is the web address of the source image with the scheme omitted. Any accessible image URL can be used on our demo server, but productive instances of the qCrop Server might be limited to dedicated domains.
Example: **qcrop.cloud/QCROP_SAMPLES/01.jpg”
Access to the source image will be per HTTP or HTTPS in dependance of the remote host’s preferences.
Sample URLs
Here is a list of valid sample URLs for the Crop-To-File service (source images might not contain qCrop cropping hints and therefore produce poor optical cropping results - this URLs are only intended for syntactical reference). Feel free to copy this addresses to your browser and play with the parameters according to this documentation.
https://qcrop.net/crop-to-file/w760:h480:mjpg/qcrop.cloud/QCROP_SAMPLES/12.jpg

https://qcrop.net/crop-to-file/w760:a4x3:mjpg:q75:csRGB/qcrop.cloud/QCROP_SAMPLES/35.jpg

https://qcrop.net/crop-to-file/w800h400:prRes80ppcm:phyW20cm:mjpg:q75:csRGB:noCache/qcrop.cloud/QCROP_SAMPLES/18.jpg
© 2020-2021, append[x] GmbH, Egling-Endlhausen
How to use the Crop-to-Data Service
coming soon
Crop-to-Debug
Crop-to-Debug is a tool for system administrators. It simulates a cropping act, but does not actually deliver a cropped image as a result, but rather a dump of diagnostic data. It is executed with exactly the same syntax as Crop-to-File with only the Route being renamed to crop-to-debug.
The output is a JSON formatted list of internal parameters and possible errors and warnings. The information can be used for troubleshooting or for automated pre-approval of source images.
Please refer to Crop-to-Data URL syntax for a more comprehensive description of the diagnostic information in the Crop-to-Debug dump.
Sample URL
https://qcrop.net/crop-to-debug/w760:h480:mjpg/qcrop.cloud/QCROP_SAMPLES/12.jpg
Sample Output
QCropToFileJob {
    qcache: QCache {
        source_path: "qcrop.cloud/QCROP_SAMPLES/01.jpg",
        source_filename: "01.jpg",
        source_basename: "01",
        source_extension: "jpg",
        source_url: "http://qcrop.cloud/QCROP_SAMPLES/01.jpg",
        source_http_eta: "\"5f73472b-28fb5b\"",
        source_http_length: "2685787",
        source_http_lastmod: "Tue, 29 Sep 2020 14:39:39 GMT",
        source_http_mime: "image/jpeg",
        source_hash: "F5563BE8F5C85C3B8034F82C90ACD03D679FB2AD56A16F3A6230BB55EDFC9D34",
        repository_prefix: "/home/capcom/qcrop-cache/",
        primary_dir: "/home/capcom/qcrop-cache/primary/F5563BE8/F5C85C3B/8034F82C/90ACD03D/679FB2AD/56A16F3A/6230BB55/",
        primary_file: "EDFC9D34.jpg",
        primary_path: "/home/capcom/qcrop-cache/primary/F5563BE8/F5C85C3B/8034F82C/90ACD03D/679FB2AD/56A16F3A/6230BB55/EDFC9D34.jpg",
        primary_sidecar_path: "",
        norm_digital_dir: "/home/capcom/qcrop-cache/norm_digital/F5563BE8/F5C85C3B/8034F82C/90ACD03D/679FB2AD/56A16F3A/6230BB55/",
        norm_digital_file: "EDFC9D34.jpg",
        norm_digital_path: "/home/capcom/qcrop-cache/norm_digital/F5563BE8/F5C85C3B/8034F82C/90ACD03D/679FB2AD/56A16F3A/6230BB55/EDFC9D34.jpg",
        norm_client_dir: "/home/capcom/qcrop-cache/norm_client/F5563BE8/F5C85C3B/8034F82C/90ACD03D/679FB2AD/56A16F3A/6230BB55/",
        norm_client_file: "EDFC9D34.jpg",
        norm_client_path: "/home/capcom/qcrop-cache/norm_client/F5563BE8/F5C85C3B/8034F82C/90ACD03D/679FB2AD/56A16F3A/6230BB55/EDFC9D34.jpg",
    },
    metadata: QMetadata {
        metadata_version: 4,
        client_version: 3,
        date: "2020-01-01",
        old_core_data: CoreMetaData {
            mimetype: "JPEG",
            w: 6240,
            h: 4160,
            orientation: 1,
        },
        act_core_data: CoreMetaData {
            mimetype: "JPEG",
            w: 6240,
            h: 4160,
            orientation: 1,
        },
        crop_hints: [
            CropHint {
                assoc: None,
                hard_crop: RelRect {
                    x: 0.0,
                    y: 0.0,
                    w: 100.0,
                    h: 100.0,
                },
                soft_crop: [
                    RelRect {
                        x: 0.0,
                        y: 0.0,
                        w: 100.0,
                        h: 100.0,
                    },
                ],
                vector: RelPoint {
                    x: 50.0,
                    y: 50.0,
                },
            },
        ],
    },
    target_brief: QCropToFileBrief {
        width: Some(
            800,
        ),
        height: Some(
            400,
        ),
        aspect_ratio: Some(
            2.0,
        ),
        mime_type: "jpg",
        compr_qual: 75,
        density_x: 72,
        density_y: 72,
        pr_res: 80,
        pr_res_unit: PPCM,
        phy_width: Some(
            200.0,
        ),
        phy_height: None,
        color_profile: Some(
            "sRGB",
        ),
        strip_profile: false,
        file_cache: false,
    },
    render_brief: QRenderBrief {
        crop_rect: PixRect {
            x: 0,
            y: 520,
            w: 6240,
            h: 3120,
        },
        width: 800,
        height: 400,
        mime_type: "jpg",
        compr_qual: 75,
        density_x: 72,
        density_y: 72,
        color_profile: Some(
            "icc-profiles/sRGB.icc",
        ),
        strip_profile: false,
        file_cache: true,
    },
    target_hash: "8716A86E713837989C30E2772AE90D359A062C2D4073544E7D6FE840CF22080B",
    target_dir: "/home/capcom/qcrop-cache/crops/8716A86E/71383798/9C30E277/2AE90D35/9A062C2D/4073544E/7D6FE840/",
    target_file: "CF22080B.jpg",
    target_path: "/home/capcom/qcrop-cache/crops/8716A86E/71383798/9C30E277/2AE90D35/9A062C2D/4073544E/7D6FE840/CF22080B.jpg",
}
© 2020-2021, append[x] GmbH, Egling-Endlhausen
The Cache Service
© 2020-2021, append[x] GmbH, Egling-Endlhausen
How to integrate the qCrop Webclient
coming soon
Explanations
coming soon
Understanding aspect ratio
coming soon
Which sRGB to use?
coming soon
qCrop and Artificial Intelligence
coming soon
Reference
coming soon
The qCrop Architecture
coming soon
Crop-to-File URL syntax
coming soon
Crop-to-Data URL syntax
coming soon
Crop-to-Debug
Coming soon...
© 2020-2021, append[x] GmbH, Egling-Endlhausen
Color-Management
The qCrop service as of version 2020.09.x provides basic Color Management support as follows:
Colorspace conversion (and color separation) is not supported. The cropped target image will always be in the same colorspace as its source.
Color profiles can be applied and converted with the “c<ProfileName>” cropping parameter. qCrop supplies 98 industry standard color profiles for that purpose. The available color profiles are listed below. The desired profile name is put directly after the c-keyword as in this example:
cLStar-RGB-v4
If the source image has no color profile embedded and one of qCrop’s supported color profiles is applied with the “c<ProfileName>”-parameter, the color profile will be declared and embedded in the target image without color conversion.
If the source image has a color profile embedded and one of qCrop’s supported color profiles is applied with the “c”-parameter as target profile, a proper conversion will be executed and the target profile will be embedded in the target image.
Notice: It is the integrators responsibility to choose a meaningful target profile. Mismatches, like the application of a CMYK profile to an RGB image, are not discovered, cause no error messages and potentially result in discoloration.
Color profiles can be stripped from the target image with the “stripColorProfile” cropping parameter. This is sometimes desirable to reduce the size of the target image, but requires a well-defined environment in which to show the target image. If the “stripColorProfile” parameter is used together with the “c<ProfilName>” parameter, qCrop will first do the color profile conversion and afterwards remove the color profile from the target file, regardless of the order of the parameters in the parameter block.
Modern browsers assume the sRGB color profile as default for images that have no embedded color profile. It is therefore a common workflow in online publishing to convert an image to sRGB and then remove the profile from the file. This results in a smaller file size, while also producing correct colors in the browser. This workflow can be accomplished in qCrop with using the “c<ProfilName>” and “stripColorProfile” parameters together:
csRGB:stripColorProfile
There exist some slight variations of the sRGB standard. For this reason, qCrop offers multiple different profile names for sRGB profiles. Please refer to the article Which sRGB to use? for a full explanation of qCrop’s sRGB profiles.
Supported Color Profiles
- AdobeRGB1998
- AppleRGB
- CineLogCurve
- CineonLog_M
- CineonLog_M_Knee_10
- CineonLog_M_Knee_20
- CineonLog_M_Knee_30
- CineonLog_M_Knee_60
- coated_FOGRA39_GCR_bas
- CoatedFOGRA27
- CoatedFOGRA39
- CoatedGRACoL2006
- ColorMatchRGB
- compatibleWithAdobeRGB1998
- eciCMYK_v2
- eciRGB_v2
- eciRGB_v2_ICCv4
- GRACoL2006_Coated1_GCR_bas
- Gray
- Gray-CIE_L
- ISOcoated_v2_300_bas
- ISOcoated_v2_300_eci
- ISOcoated_v2_bas
- ISOcoated_v2_eci
- ISOcoated_v2_grey1c_bas
- ISOcoated_v2_to_PSOcoated_v3_DeviceLink
- ISOnewspaper26v4
- ISOnewspaper26v4_gr
- ISOnewspaper_v4_26_bas
- ISOuncoatedyellowish
- ISOuncoatedyellowish_bas
- ITULab
- JapanColor2001Coated
- JapanColor2001Uncoated
- JapanColor2002Newspaper
- JapanColor2003WebCoated
- JapanWebCoated
- LStar-RGB
- LStar-RGB-v2
- LStar-RGB-v4
- PAL_SECAM
- PSO_Coated_300_NPscreen_ISO12647_bas
- PSO_Coated_300_NPscreen_ISO12647_eci
- PSO_Coated_NPscreen_ISO12647_bas
- PSO_Coated_NPscreen_ISO12647_eci
- PSOcoated_v3
- PSOcoated_v3_to_ISOcoated_v2_DeviceLink
- PSO_LWC_Improved_bas
- PSO_LWC_Improved_eci
- PSO_LWC_Standard_bas
- PSO_LWC_Standard_eci
- PSO_MFC_Paper_bas
- PSO_MFC_Paper_eci
- PSOsc-b_paper_v3_FOGRA54
- PSO_SNP_Paper_bas
- PSO_SNP_Paper_eci
- PSO_Uncoated_ISO12647_bas
- PSO_Uncoated_ISO12647_eci
- PSO_Uncoated_NPscreen_ISO12647_bas
- PSO_Uncoated_NPscreen_ISO12647_eci
- PSOuncoated_v3_FOGRA52
- PSR_LWC_PLUS_V2_BAS
- PSR_LWC_PLUS_V2_M1_v2
- PSR_LWC_STD_V2_BAS
- PSR_LWC_STD_V2_M1
- PSR_MF_V2_M1
- PSR_SC_PLUS_V2_BAS
- PSR_SC_PLUS_V2_M1
- PSR_SC_STD_V2_BAS
- PSR_SC_STD_V2_M1
- SC_paper_bas
- SC_paper_eci
- SMPTE-C
- sRGB
- sRGB2014
- sRGB_D65_colorimetric
- sRGB_D65_MAT
- sRGB_IEC61966-2-1_no_black_scaling
- sRGB_ISO22028
- sRGB_Profile
- sRGB_v4_ICC_preference
- SWOP2006_Coated3_GCR_bas
- SWOP2006_Coated5_GCR_bas
- uncoated_FOGRA29_GCR_bas
- UncoatedFOGRA29
- uncoatedYellow_FOGRA30_GCR_bas
- USWebCoatedSWOP
- USWebUncoated
- VideoHD
- VideoNTSC
- VideoPAL
- WAN-IFRAnewspaper26v5
- WAN-IFRAnewspaper26v5_gr
- webcoated_FOGRA28_GCR_bas
- WebCoatedFOGRA28
- WebCoatedSWOP2006Grade3
- WebCoatedSWOP2006Grade5
- Web_SC_FOGRA40_GCR_bas
© 2020-2021, append[x] GmbH, Egling-Endlhausen
System Requirements
qCrop Webclient
The qCrop Webclient utilizes state-of-the-art Webassembly technology for best performance and in consequence requires rather modern browers to work properly. In this section we provide a list of tested and approved browers for different operating systems.
Safari
 Safari 14.x.x (macOS Catalina 10.15.x)
- Safari 13.x.x (macOS Catalina 10.15.x)
- Safari 13.x.x (macOS Mojave 10.14.5 or higher)
- Safari 13.x.x (macOS High Sierra 10.13.6 or higher)
 Safari 12 or lower on all macOS versions
Firefox
- Firefox 82.0.x (tested on Win10, Linux)
- Firefox 81.0.x (tested on Win10, Linux)
- Firefox 80.0.x (tested on macOS, Win10, Linux)
- Firefox 79.0 (tested on macOS, Win10, Linux)
- Firefox 78.0.x (tested on macOS, Win10, Linux)
Microsoft Edge
- Microsoft Edge 86.0.x (tested on Win10)
- Microsoft Edge 85.0.x (tested on Win10)
Microsoft Internet Explorer
- Microsoft Internet Explorer 11.x (tested on Win10)
Chrome
- Google Chrome 86.0.x (tested on macOS, Win10, Linux)
- Google Chrome 85.0.x (tested on macOS, Win10, Linux)
Vivaldi
- Vivaldi 3.4.x (tested on macOS, Win10, Linux)
- Vivaldi 3.3.x (tested on macOS, Win10, Linux)
- Vivaldi 3.0.x (tested on macOS, Win10, Linux)
Brave
- Brave 1.16.72 (tested on macOS, Win10, Linux)
- Brave 1.14.84 (tested on macOS, Win10, Linux)
Opera
- Opera 72.0.x (tested on macOS, Win10, Linux)
- Opera 71.0.x (tested on macOS, Win10, Linux)
© 2020-2021, append[x] GmbH, Egling-Endlhausen
Release-Notes
qCrop Release Cycle
All qCrop services and components are developed and released with a common version number.
qCrop major versions are projected for release twice a year, one by the end of March, one by the end of September. Major versions typically introduce new features and might come with significant changes in the underlying architecture of qCrop, the integration APIs, the deployment options, the qCrop metadata format and user interface(s). APIs are kept backward compatible at least for the last two major versions (= one year). Any changes that will break backward compatibility at some point in the future are announced well in advance in the Release-Notes.
Any number of minor versions might be released between the major versions for the purpose of security and bug fixes or for the introduction of highly anticipated new features. Minor versions are generally not breaking compatibility of APIs.
The qCrop version number consists of three numeric parts:
- The first part represents the last two digits of the release year.
- The second part represents the month of the release, either “03” for the March release, or “09” for the September release. The first and second part of the version number together form the major version number.
- The third part represents the counting number of minor versions within the major version. It starts from “001” with each new major version.
According to this rules, the current version of qCrop is 20.09.001.
Legend
The Release Notes use the following icons for the individual changes:
 New Feature.
 Fix.
Fix. Improvement.
 Removal.
 Warning.
 Known, unresolved issue.
Table of Release Notes
- 20.09 (2020-09-15)
Legacy Releases
Until mid 2020, qCrop has been developed and marketed as “KIMEcrop”. KIMEcrop had a different versioning scheme and was released in two major versions (1 and 2). qCrop is backward compatible with both KIMEcrop versions. Images that were provided with KIMEcrop cropping hints, and therefore contain the KIMEcrop metadata format, are automatically converted to the most recent qCrop metadata format.
© 2020-2021, append[x] GmbH, Egling-Endlhausen
qCrop Release Notes 20.09
Currently Known Issues
- None
Version 20.09.001 (2020-09-15)
Release Purpose: Early Developer Preview
- Webclient: fullscreen toggle feature.
- Webclient: cropping hints flip through feature.
- Bugfix
- Rewrite of the entire qCrop Suite in Rust.
- Consolidation of the cropping service and webclient into one microservice.
- Unstable features are disabled for this version.
- crop-to-file “s”-parameter will be deprecated in version 21.03!